Pages

Monday, November 8, 2010

Fall Flower and Pumpkin Wreath.

So where did I use those flowers?  Here on this wreath.  I think it tuned out fantastic and since I’ve already shown you how to make the flowers, there’s not much else to tell you except the 3-D pumpkin.

P1070090

I used two colors of organza twisted together for the ribbon.  I tied a big blow but when I tried to use it, I saw the wreath really didn’t need it.  The pumpkin is a cut file I made with George because I didn’t like any I had on any Cricut cart.  I embossed it the Cuttlebug Victoria A2 embossing folder and rubbed the embossing with a gold ink pad.  I can’t remember what cart the leaves are from, but I folded them down the middle and curled the edges down.  I also inked them with a brown ink pad.  Every thing is wired on the wreath because hot glue has a tendency to release when in the sun for long periods of time and I wasn’t sure where I would hang it. 

P1070091

The pumpkin is about 6 inches across and the largest flower is about 3 1/2 inches across. 

P1070092

P1070093

P1070094

P1070095


P1070096

Well, that’s it!  Check in for more surprises, paper wise, this week.

Saturday, November 6, 2010

Flowers by Cricut

I have been squirreled away in my studio making flowers for a project I’ll show you all next week, but I thought I’d show you how I made them.  I don’t usually post on Saturdays because I reserve that time for my husband and family; however, Jim’s working and I have no other obligations, so I thought I’d send a bonus post to those of you who check in on the weekends. 

I’ve been making these. 

P1070073

P1070074

Here’s how I made them:

I started with the flower cut on A Child’s Year, and made several sizes.  then I collected my supplies

P1070076

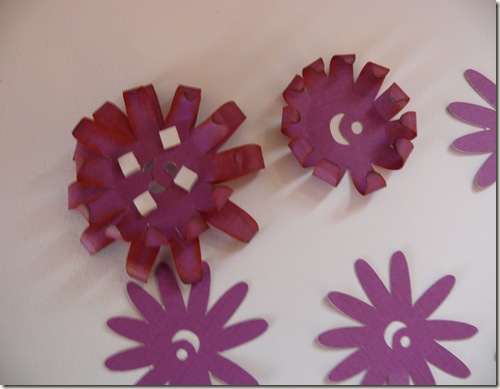
I inked the edges and although I don’t show it here, I used two different colors ink, orange and yellow on both sides of the flower because the tips will be curled up except for the bottom flower. 

P1070079

I used a wooden pick to curl the petal down and up on the rest of the layers. I also folded the flowers down for the first couple of rows and then left some as they were and then up on the last couple of rows. 

P1070081

After the bottom two rows were clued together, I added pop dots before I added the next row. 

P1070082

I used pop dots a couple more times to lift the center of the flower up.  Just before I added the last flower layer, I ran a length of about 15 inches of floral wire through the flower, so that it could be used in a way I am not going to share right now. 

P1070083 P1070084

I wanted to add some texture to the flower and I had the bright idea to use a brown pom pom.  The only problem was I didn’t have any brown pom poms.  Then I thought, “Why not dye them!” Actually I think they turned out better this way because they have a depth of color they wouldn’t have otherwise. 

P1070087

I think they turned out more than acceptable.  What do you think?P1070088

P1070089

Now I can’t wait to show you how I am using them. 

Friday, November 5, 2010

Tree Trimming Invitation

Over on The Cuttlebug Spot the challenge this week is to create an invitation.  Every year our family gathers on either Friday or Saturday after Thanksgiving to decorate our tree.  The kids, our grown kids, usually get a charge of seeing all our old ornaments, and Jim and I enjoy seeing the kids, the grandchildren, decorate the tree.  And yes, I usually do have to go back and “fix” the tree because there are bare spots.  I try to do a little baking for this day, and I make a huge pot of chili. We party and enjoy each other company.  Then we put the kids to bed and we sit down to watch Chevy Chase’s National Lampoon’s Christmas Vacation.  We all say the dialogue with the characters and laugh our guts out.  OK, maybe not our guts, but we laugh a lot!  And no, we never get tired of it!

I always send out invitations to Thanksgiving dinner, and I will this year too, but this year I thought I’d send out an invitation to our tree trimming party. So The Cuttlebug Spot Challenge was the perfect opportunity for me. 

I used the Victoria A2 embossing folder for this A2 card and the Christmas Noel cart for the tree branch and ornament on the card.  I am sorry, but I can‘t remember what cart I got the frame from.  The patterned paper is from the new Christmas Foiled stack from DCWV and the card base is  Core’dinations Gemstone.  I have to tell that  the Gemstones line is wonderful.  Check it out.  The gold brushed paper that I embossed is Paper Pizazz, and the green is Core’dinations.  The white decoration on the ornament is from the DCWV Glitter Stack.  The rest are all scraps.  The sentiment is a dollar stamp I picked up at Joann last week. It had several gems with it and I used one of the red ones for the center of the ornament.  I also distressed the embossed frame with Tim Holtz Walnut distress ink. I have since wiped the embossed frame with a rag and it looks much better.  P1070058

P1070060

P1070061

P1070063

It turned out much like I wanted it to. That in itself is a miracle.  Ideas that spring up in my head rarely turn out the way I see them in my head!  Now I just have to make 5 more.

Hey, by the way, when do you trim your tree?

Wednesday, November 3, 2010

Future Baseball Star

Yeah!  I am going crazy scrapping my youngest grandson’s photos. I really like how this LO turned out.  I love the colors and paper in this LO.  I hope you like it too. 

Chaz LO014

The background paper is from ummmm . . . Autumn Leaves and the patterned paper is from We R Memory Keepers.  I love this patterned paper and brought several sheets a few years ago when I did a album for my husband for Father’s day.  It reminds me of a man’s tie.  Just love it. The card stock comes from my usual sources—Bazzill and Coordinations.  Also, see the woven net on the LO.  I’ve had that forever and I pulled it out and knew it would be perfect for this LO.  So nice. 

I used Base Camp for the words “Future” and “Star” and the Baseball word art comes from the Sports Mania Cart.  I used the black out feature on my Gypsy to get rid of rest of the cut.  The stars are all from George and Basic Shapes cut at various sizes and the swirls are several different ones welded with my Gypsy and are from Ashlyn’s Alphabet.  I journaled at the top and bottom of the LO because I thought it would make the best use of space on the LO.

I blew up the photo on the title page on my scanner and reprinted it as n 8 X10 and then trimmed it down. Then I scanned the smaller photos as pairs and printed 2 of them per regular 4 x 6 photo sheet.  I used my 2” square punch to trim them to size.  I also used some little star buttons I had in my stash to add some interest to the page and mix things up. 

Chaz LO015Chaz LO001Chaz LO016Chaz LO017Chaz LOs002Chaz LOs001

Tomorrow’s Friday and I have another project to share with you. 

Tuesday, November 2, 2010

Vroom-Vroom—A SOUS Sketch!

I saw this sketch over on Stuck on U Sketches and thought it was perfect for these pictures of our little Chaz playing with this race car toy. He got so much joy out of it.  His uncle Norm sat very patiently with him until he learned how it worked.  I think he was about 15 months old.  He still loves any thing with wheels.  It was really hard to get any good photos because of the light coming in through the window and because he is so darned fast.  I had to scrap them anyway. 

P1070051

I fell in love with this Crate Paper a couple of years when I saw it at my local scrapbooking store.  I bought the whole line.  Sadly the store closed and the only places I have locally to shop at are Hobby Lobby and Joann’s.  Oh, how I miss Two Scrappy Cats!  Boo hoo!  There is a whole lot to be said about a local scrapbooking store. Anyway I bought the paper for another purpose but since I’d bought the whole line, I thought I could use these three sheets here.  So cute. 

The card stock comes from my two favorites companys Bazzill and Cordinations plus some scraps from my trusty scrap drawers. When I looked at this paper I immediately thought of this wheel like cut on Accent Essentials.  I cut the big one at 7” and the smaller ones at 1 1/2 and 2”.  The font is Mickey and the car is from Mickey and Friends. The journaling stamp is a Hobby Lobby Stampendous Stamp.  I say it again!  SO CUTE!  I love the way this turned out.  Thank you SOUS for this great sketch!  Now for some close-ups!

P1070052

P1070053P1070054

P1070055

Oh, look at that face!  So intense! 

P1070057

That’s my offering for today!  Hope you enjoyed it. 

Peek a Boo!!

Yes, it’s my grandson again!  I can’t help it.  He’s our last baby and I adore him.  He’s also the only baby we’ve had really close by so that he knew us from a very young age because he saw us so much. 

Just before he was 6 months old and just before Christmas, I was out shopping with my three girls, my two daughters and my daughter-in-law, and Jody and I were sitting with Chaz while Stacey and Amy were shopping some more, he started playing peek a boo all by himself holding up his blanket and laughing.  It is a memory I treasure, so I had to scrap these pictures.  I took these pictures after I had fed him and was cleaning him up. He grabbed the wash cloth and and started playing peek a boo.  Sometimes he was so fast I could barely get a photo snapped.  I knew I had to capture the joy and exuberance of his favorite game. 

Chaz LO006

I used the animals from New Arrivals and thought it would be fun to have them peeking out from under the photos.  The font is Ashlyn’s Alphabet and the scalloped rectangle and squares are from Gypsy Wanderings. I took the colors from the photos and the paper was from my stash.  The photo mats are from a very old Sissix mat stack.  The card stock is Bazzill and Cordinations  The little bit of ribbon is from Hobby lobby. 

Chaz LO007

Chaz LO008Chaz LO009What happened to the light on this photo?  Any way you can see the title is pop dotted. 

Chaz LO010

Chaz LO011

Chaz LO012Chaz LO013

I am always so happy when I get photos scrapped and the memory is down on paper.  Satisfaction!

Monday, November 1, 2010

And 1 makes 9!

This week is going to be a hodgepodge of whatever strikes my fancy.  Today I’ve got a LO I did for my last grandson’s birth.  We have 9 grandchildren each one as special as the rest, but Chaz is our last and we are trying to enjoy every minute of his babyhood. This means I’ve been spending more time playing with him than I’ve spent scrapping his life so far.  So I stopped recently and started trying to do some scrapping before the details of all those photos disappear from my head.  Chaz LOs003I’ve scrapped the births of 7 of our nine grandchildren and it’s sometimes been a challenge to have a new take on it. I think that’s what kept me from tackling Chaz’s photos.  We were extremely happy for his arrival but we have been for all our grandchildren.  I also think one of the challenges of scrapping for a baby boy is to keep things slightlymasculine and yet hone in on the sweetness of the baby.  I chose these colors because I think they allowed me to do just that.  I wanted the page to have a slightly dreamy look because he really was a dream come true for our son and his wife as well as for us.  So I added the swirls and start to indicate how heaven sent he was.  Chaz LOs004

Chaz LO005

I remember doing lots of layering because I was out of dimensionals, but I think it turned out fine. You’ll also see lots of faux stitching and some ribbon at different points and for different emphasis on the pages. Chaz LO004  

Chaz LOs005

I also tried to echo the circle theme of one of the papers with the journaling circles.

Recipe:

DCWV for patterned paper

DCWV and Bazzill for the cardstock

Cuttin’ Up for the font

Ashlyn’s Alphabet for swirls

George and basic shapes for stars and circle cuts

Signo white gel pen for stitching and a blue gel pen for journaling. 

I like the way this LO turned out.  Satisfied—Content!